Your cart is currently empty!
Ultimate Guide to an ADA Compliant Bathroom
So, you’re building a commercial bathroom. You’ve picked out the materials for your partitions, the colors, everything right down to the toilet paper dispenser. But now you have to decide where to put everything and what size it should be. And that is a daunting task that leaves many people wondering, are there rules I should be following? The answer is yes! The standards for making your bathroom ADA compliant are some of the most important ones to follow.
We know that building an ADA compliant bathroom can feel overwhelming. That’s why we created this guide to tell you what you need to know about ADA compliance. If you still have questions afterward or want an expert to walk you through the process, we’ve got a whole team of people at Partition Plus who know all the ins and outs of ADA compliant bathrooms.
 Second, you benefit from ADA compliance. People with disabilities that need ADA compliance may not want to (or be able to) return to a non-compliant facility. And not only does it help you be more accommodating to everyone you interact with, but it’s also the law.
Anybody who believes that they or someone else has been discriminated against because of disability can file an ADA complaint online. The Department of Justice investigates these claims and may use lawsuits or demand settlements if the claims are proven to be true. Businesses can have penalties of up to $55,000 for their first violation, so it’s important that every business owner gets ADA compliance right.
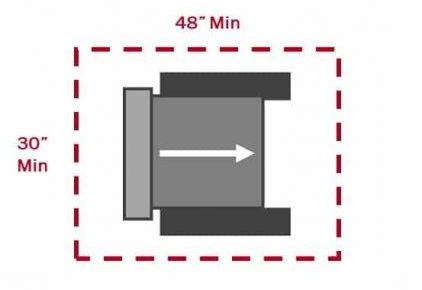
Clear floor space is the term used to describe the open unobstructed floor around and beneath objects. A big part of that is a 30-inch by 48-inch standard space used to fit a wheelchair. These spaces are needed in front of fixtures like sinks and hand dryers and other locations. A good rule of thumb is if you want someone in a wheelchair to be able to access an item there should be at least this much space in front of it (keep in mind you should always check for more specific standards for different items). Make sure this space isn’t obstructed by other items.
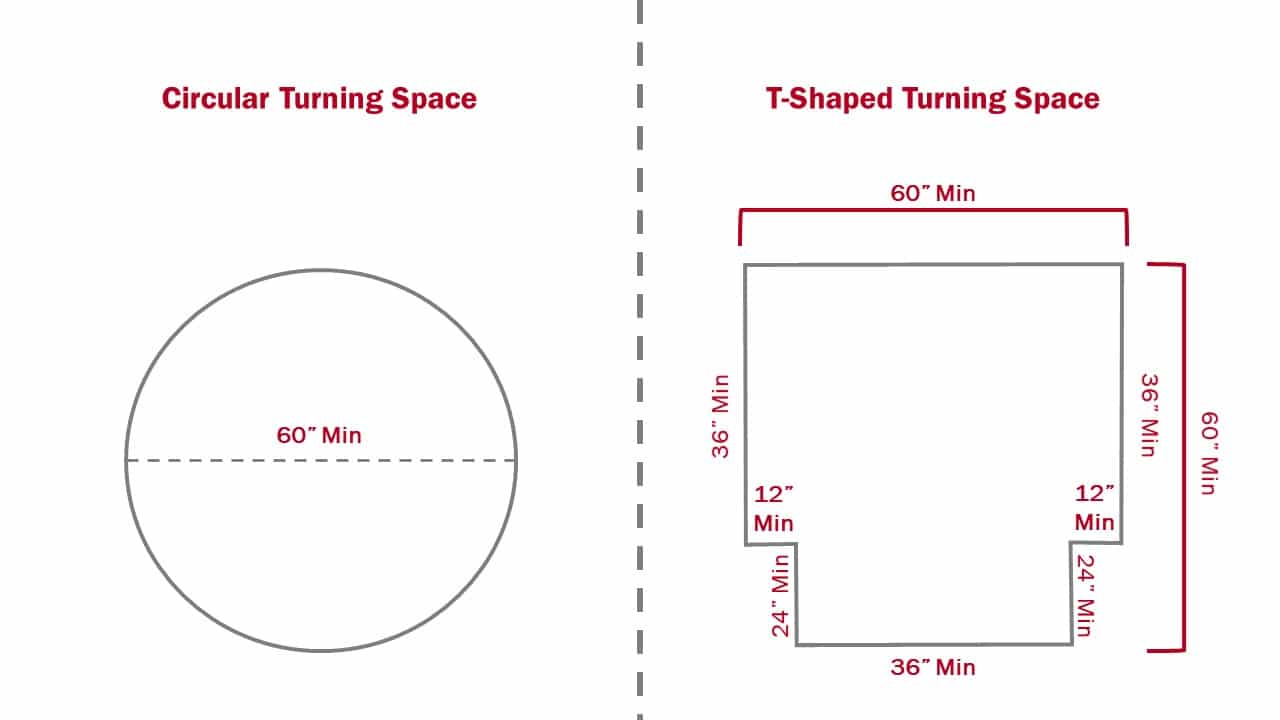
Turning spaces are simply areas where people in wheelchairs can turn around. They can be made in two different styles and should be completely flat if possible.
A circular turning space should have a 60-inch diameter. It should be generally unobstructed but may include fixtures that have the right knee and toe clearance (see section 306).
A T-shaped turning space is split into two arms and a base and should fit in a 60-inch square at MINIMUM. The arms should be at least 36-inch wide and clear of obstructions for at least 12 inches deep. The base should be at least 36-inch wide and clear of obstructions until 24 inches deep. You may be able to place a fixture at the end of the base or one arm but you need to include the right amount of knee and toe space.
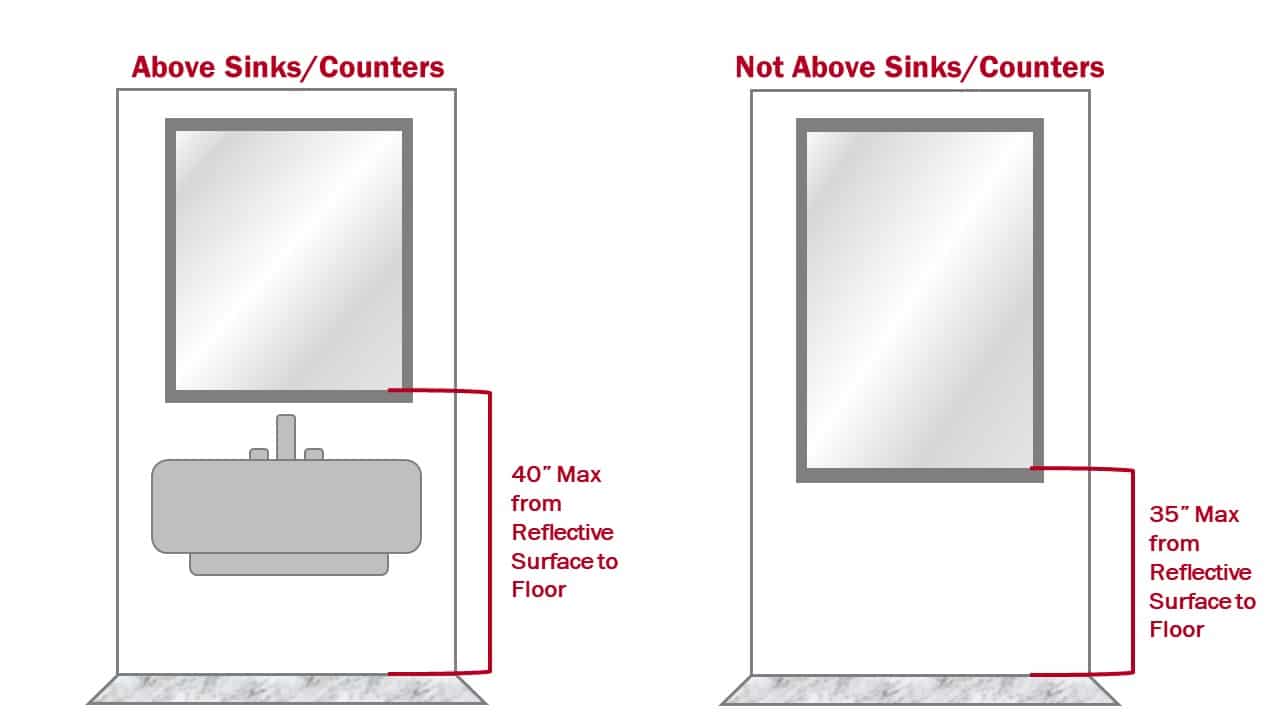
For mirrors, you just need to decide whether they are going above sinks or counters. If it is above an item, the bottom of the reflective piece of the mirror can be 40 inches maximum above the floor. If it is not, it can only be up to 35 inches maximum above the floor.
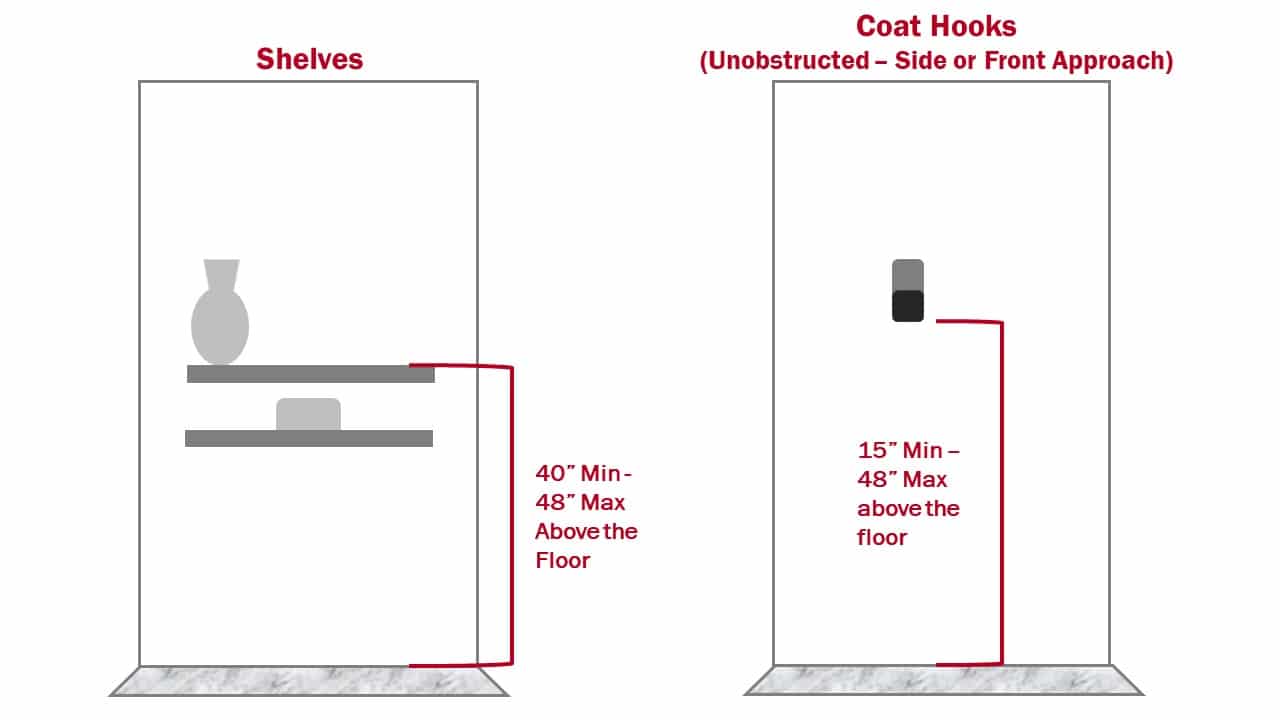
Shelves are easy, just make sure they are in between 40 inches and 48 inches above the floor. Coat hooks are also fairly simple, they can be between 15 inches and 48 inches above the floor.
The tricky part comes with obstructions, that is things beneath items like these. These obstructions make it more difficult for people in wheelchairs to reach these items. The diagrams below describe the standards for different reach ranges found in section 308.
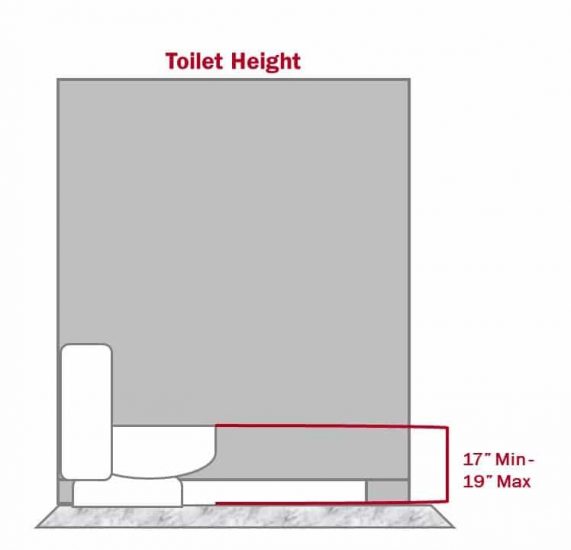
The top of the closed toilet seat should be between 17 and 19 inches off the ground. If you are making a bathroom for children and need the toilet to be shorter check out the standards for those bathrooms under section 604.9.
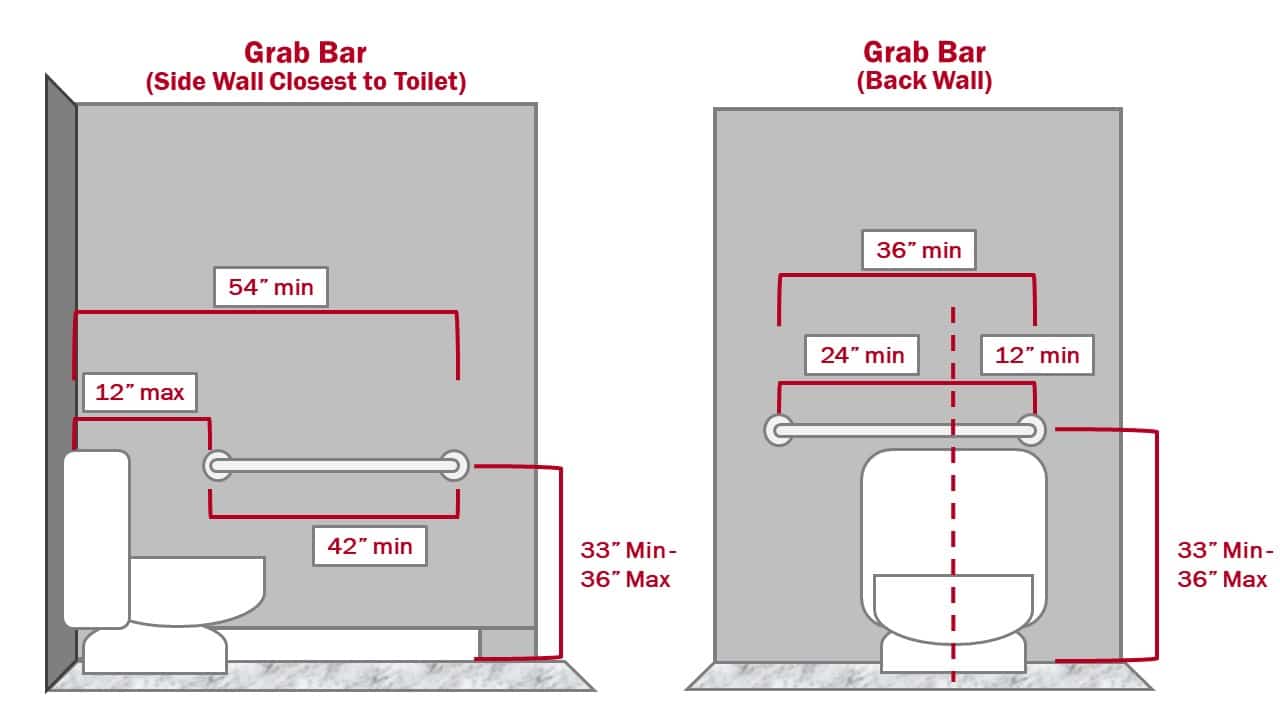
You’ll need two grab bars in your ADA compliant bathrooms. In wheelchair-accessible stalls, there will be one grab bar on the side closest to the toilet and another on the back wall. In ambulatory accessible stalls, there will be two grab bars on either side wall.
A side wall grab bar should be at least 42 inches long. It should be placed a maximum of 12 inches from the back wall. Together the total distance from the back wall to the end of the bar should be a minimum of 54 inches. Lastly, the grab bar should be positioned 33 to 36 inches off the ground.
A back wall grab bar will be at least 36 inches long. Find the centerline of your toilet. The grab bar should be positioned so that at least 12 inches of it are on one side of that center line and 24 inches of it are on the other. This grab bar should also be between 33 and 36 inches off the ground.
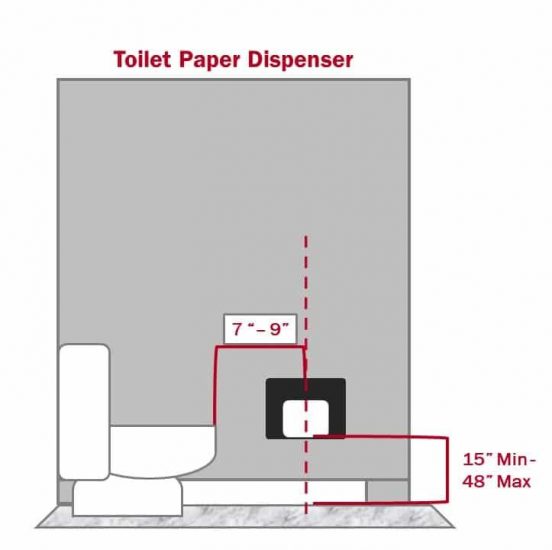
A toilet paper dispenser should be placed so that the center of the dispenser is 7 to 9 inches in front of the toilet. It should also be mounted so that its outlet is between 15 and 48 inches off the ground.
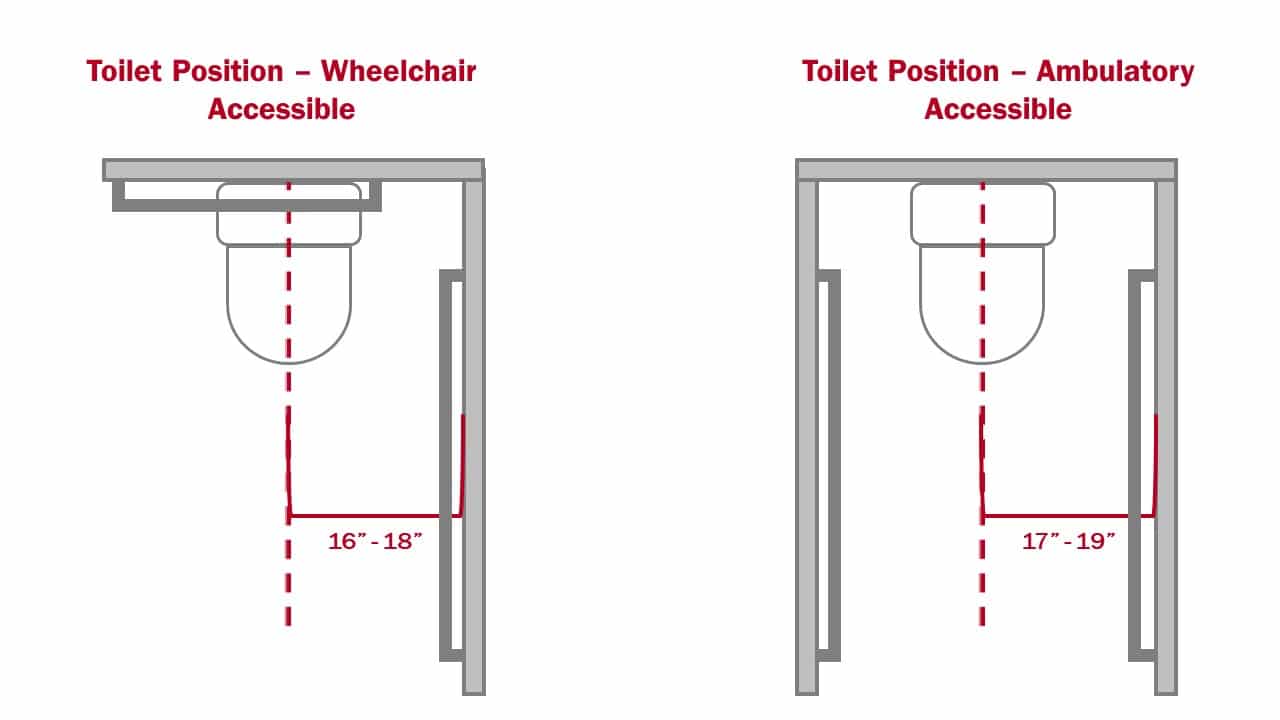
Toilet positioning will be different in the different types of stalls. In wheelchair-accessible stalls, the toilet should be installed so that its midline is 16 to 18 inches away from the closest side wall. In ambulatory accessible stalls, it should be installed so the midline is 17 to 19 inches away from the closest side wall.
Don’t worry if your grab bars overlap this space. You are measuring from the center of the toilet to the wall, not the grab bars.
Often the first thing people think about when they think of ADA compliance is wheelchair-accessible bathroom stalls. These can be a little complicated because of all the options but we’ve distilled it down to the basics.
Stalls that are accessible for people who are ambulatory are just as important as wheelchair-accessible stalls and have their own standards.
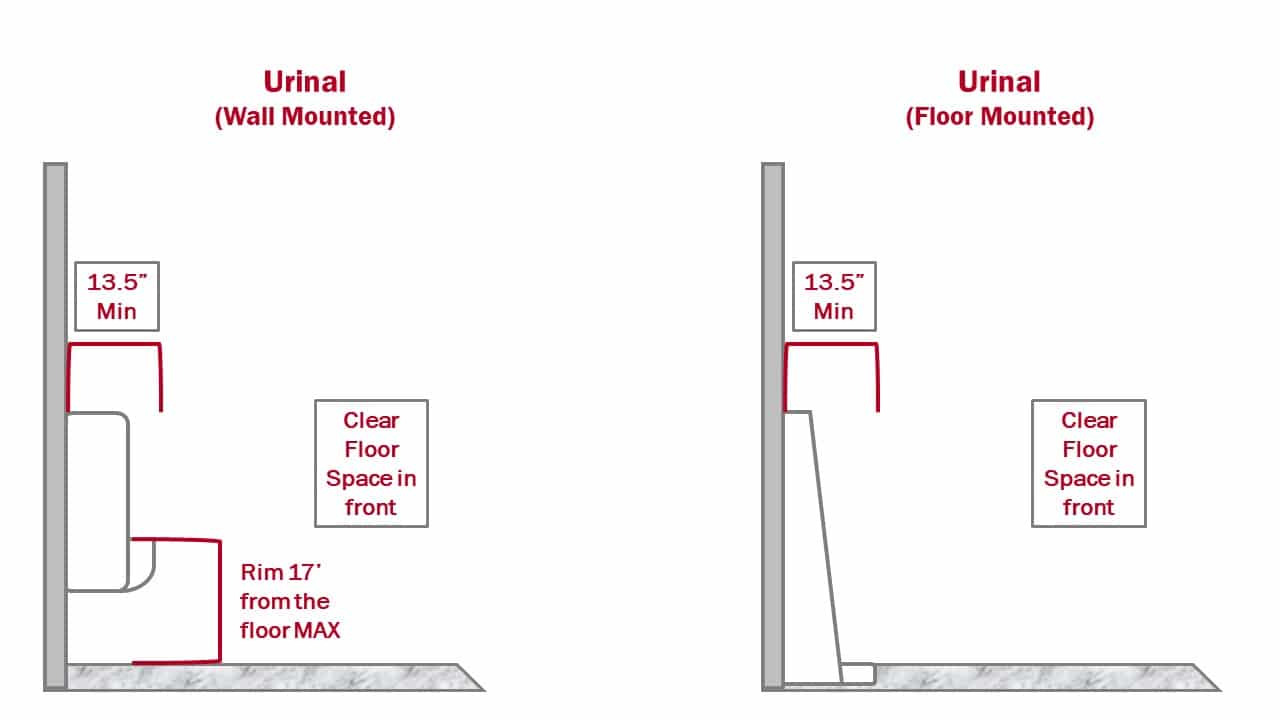
There are two types of urinals, floor-mounted and wall-mounted and both should be at least 13.5 inches deep. For wall-mounted urinals, the rim can only be up to 17 inches from the floor. Make sure you have enough clear floor space so that wheelchair users can fit in front of the urinal facing forward (remember that 30-inch x 48-inch box).
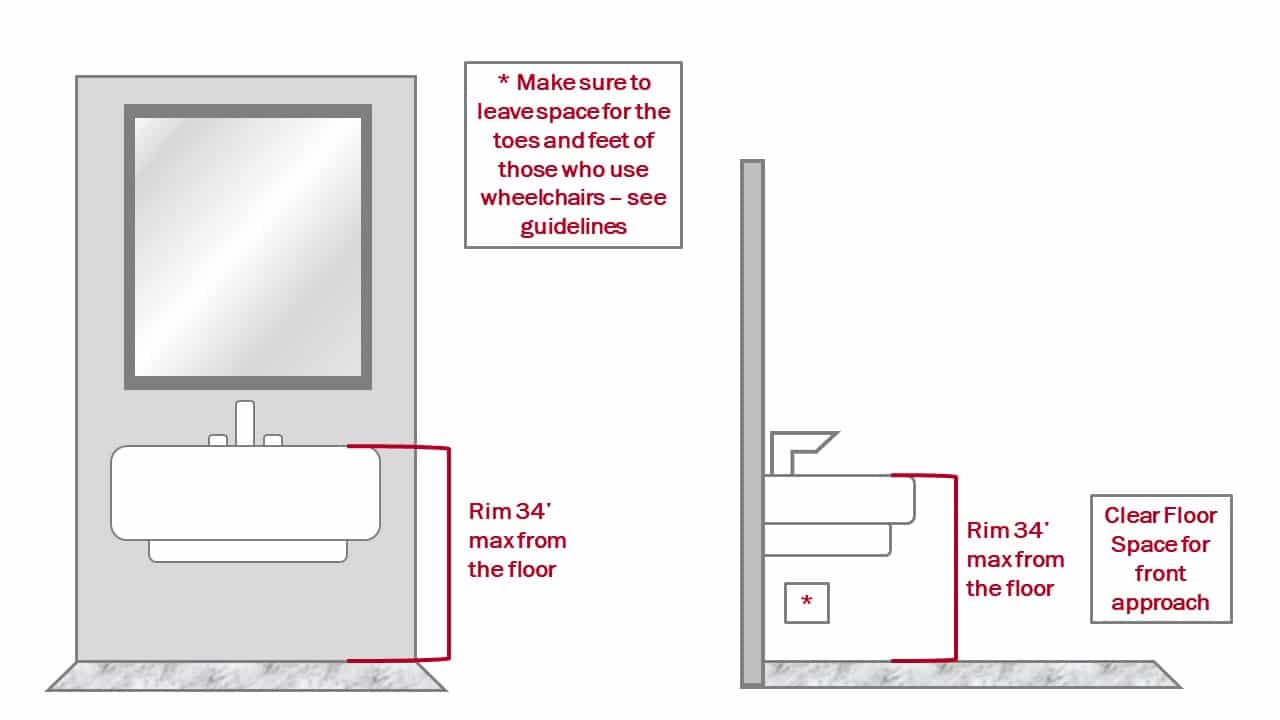
Sinks should be mounted so their rims are no more than 34 inches maximum from the floor. Clear floor space in front of sinks is important so people in wheelchairs can use them. You also need to make sure that there is enough space for the knees and toes of those in wheelchairs underneath the sink for when they pull up to use it (see section 306).
Go ahead and contact us at 800-298-9696 or [email protected] today so we can get started building your bathroom.
Second, you benefit from ADA compliance. People with disabilities that need ADA compliance may not want to (or be able to) return to a non-compliant facility. And not only does it help you be more accommodating to everyone you interact with, but it’s also the law.
Anybody who believes that they or someone else has been discriminated against because of disability can file an ADA complaint online. The Department of Justice investigates these claims and may use lawsuits or demand settlements if the claims are proven to be true. Businesses can have penalties of up to $55,000 for their first violation, so it’s important that every business owner gets ADA compliance right.
Clear floor space is the term used to describe the open unobstructed floor around and beneath objects. A big part of that is a 30-inch by 48-inch standard space used to fit a wheelchair. These spaces are needed in front of fixtures like sinks and hand dryers and other locations. A good rule of thumb is if you want someone in a wheelchair to be able to access an item there should be at least this much space in front of it (keep in mind you should always check for more specific standards for different items). Make sure this space isn’t obstructed by other items.
Turning spaces are simply areas where people in wheelchairs can turn around. They can be made in two different styles and should be completely flat if possible.
A circular turning space should have a 60-inch diameter. It should be generally unobstructed but may include fixtures that have the right knee and toe clearance (see section 306).
A T-shaped turning space is split into two arms and a base and should fit in a 60-inch square at MINIMUM. The arms should be at least 36-inch wide and clear of obstructions for at least 12 inches deep. The base should be at least 36-inch wide and clear of obstructions until 24 inches deep. You may be able to place a fixture at the end of the base or one arm but you need to include the right amount of knee and toe space.
For mirrors, you just need to decide whether they are going above sinks or counters. If it is above an item, the bottom of the reflective piece of the mirror can be 40 inches maximum above the floor. If it is not, it can only be up to 35 inches maximum above the floor.
Shelves are easy, just make sure they are in between 40 inches and 48 inches above the floor. Coat hooks are also fairly simple, they can be between 15 inches and 48 inches above the floor.
The tricky part comes with obstructions, that is things beneath items like these. These obstructions make it more difficult for people in wheelchairs to reach these items. The diagrams below describe the standards for different reach ranges found in section 308.
The top of the closed toilet seat should be between 17 and 19 inches off the ground. If you are making a bathroom for children and need the toilet to be shorter check out the standards for those bathrooms under section 604.9.
You’ll need two grab bars in your ADA compliant bathrooms. In wheelchair-accessible stalls, there will be one grab bar on the side closest to the toilet and another on the back wall. In ambulatory accessible stalls, there will be two grab bars on either side wall.
A side wall grab bar should be at least 42 inches long. It should be placed a maximum of 12 inches from the back wall. Together the total distance from the back wall to the end of the bar should be a minimum of 54 inches. Lastly, the grab bar should be positioned 33 to 36 inches off the ground.
A back wall grab bar will be at least 36 inches long. Find the centerline of your toilet. The grab bar should be positioned so that at least 12 inches of it are on one side of that center line and 24 inches of it are on the other. This grab bar should also be between 33 and 36 inches off the ground.
A toilet paper dispenser should be placed so that the center of the dispenser is 7 to 9 inches in front of the toilet. It should also be mounted so that its outlet is between 15 and 48 inches off the ground.
Toilet positioning will be different in the different types of stalls. In wheelchair-accessible stalls, the toilet should be installed so that its midline is 16 to 18 inches away from the closest side wall. In ambulatory accessible stalls, it should be installed so the midline is 17 to 19 inches away from the closest side wall.
Don’t worry if your grab bars overlap this space. You are measuring from the center of the toilet to the wall, not the grab bars.
Often the first thing people think about when they think of ADA compliance is wheelchair-accessible bathroom stalls. These can be a little complicated because of all the options but we’ve distilled it down to the basics.
Stalls that are accessible for people who are ambulatory are just as important as wheelchair-accessible stalls and have their own standards.
There are two types of urinals, floor-mounted and wall-mounted and both should be at least 13.5 inches deep. For wall-mounted urinals, the rim can only be up to 17 inches from the floor. Make sure you have enough clear floor space so that wheelchair users can fit in front of the urinal facing forward (remember that 30-inch x 48-inch box).
Sinks should be mounted so their rims are no more than 34 inches maximum from the floor. Clear floor space in front of sinks is important so people in wheelchairs can use them. You also need to make sure that there is enough space for the knees and toes of those in wheelchairs underneath the sink for when they pull up to use it (see section 306).
Go ahead and contact us at 800-298-9696 or [email protected] today so we can get started building your bathroom.
What is ADA Compliance?
In 1990 the United States signed the Americans with Disabilities Act (ADA) to prevent discrimination against people with disabilities. Since then, regulations and standards have been created and compiled in the 2010 ADA Standards for Accessible Design. This means that there are clear guidelines for many different parts of public buildings. For bathrooms, these standards include the sizes of stalls; positions of objects like grab bars, and even how much open space there should be. We’ve done our best to gather most of the standards you’ll need into this guide.Why Do I Need to be ADA Compliant?
Number one, people with disabilities benefit from ADA compliance. Think that’s only a small group? According to the CDC, 26% of adults in the US have a disability. That’s one in four people that may walk into your establishment. But ADA compliance is not just for the people you serve, it’s also for your employees who may have disabilities as well.
Cost of being ADA Compliant
You may be worried that ADA compliance is too expensive for your small business. But there are tax benefits available to make the cost of ADA compliance more manageable. If you are a small business with 30 or fewer employees or have a total revenue of $1 million or less you may be eligible for a tax credit of up to $5,000. This is to help with the costs of making your building ADA compliant. Businesses of any size can take tax deductions of up to $15,000 a year for the costs of ADA compliance. These two options can even be used together for more savings. For more information check out the ADA website’s handout.What if my Building can’t be ADA Compliant?
Any facility built after the passing of the ADA is required to be built ADA compliant. But maybe you are in an older space. Still, ADA regulations require that the space be compliant “to the maximum extent feasible” (see section 36.402 of the 2010 Standards). You are required to make the space accessible for as many people as possible. If it is physically impossible to accommodate people who use wheelchairs, then accommodations should still be made for people who use other devices or who have impaired sight.Building an ADA Compliant Bathroom
We’ve done our best to include most of the pieces you’ll need to build a standard ADA compliant public bathroom. But the best way to ensure you’re meeting ADA compliance standards is to view the 2010 standards for bathrooms in their entirety (found in Chapter 6) or to work with an ADA expert like our team members at Partition Plus. Use the links below to jump to the part of the guide you need or read it through to learn more about bathroom ADA compliance.Clear Floor Space
Turning Space
Approaches
Doors
Mirrors
Coat Hooks and Shelves
Other Accessories
Toilet Height
Grab Bars
Toilet Paper Dispensers
Toilet Position
Wheelchair-Accessible Stalls
Ambulatory Accessible Stalls
Urinals
Lavatories and Sinks
Different Kinds of Bathrooms
Clear Floor Space
Turning Space
Approaches
Not only do you need clear floor space in front of items but you need to make sure that everyone has a path to reach the items. Make sure that there is enough room for people in wheelchairs or who are ambulatory to approach items from the side and straight on. There should also be enough space for people to choose to use their left or right hand with the item. This allows people with many different disabilities to successfully use your bathroom.Doors
One of the most complicated parts of ADA compliance is deciding about your doors, both for stalls and the entrance/exit to the room. Deciding which way the doors swing and figuring out the amount of space you need to maneuver around them can be difficult. That’s one of the great reasons to get an ADA expert on board with your project like those at Partition Plus. But if you want to learn about it yourself we recommend looking at section 404.2 which has some great diagrams of all different kinds of approaches. Most wheelchair-accessible stalls swing outward but if you want the door to swing inward you will need to account for the clear floor space box (30 inches x 48 inches). This has to be space that the door does not swing into so that a wheelchair can fit in the stall and the door can close behind it. Other pointers for doors include:- Make sure your doors can be opened using 5 pounds of force or less
- Make sure the handles are between 34 inches and 48 inches off the floor
- Handles cannot require a tight grip, pinching, or twisting one’s wrist to open
Mirrors
Coat Hooks and Shelves
Forward Reach
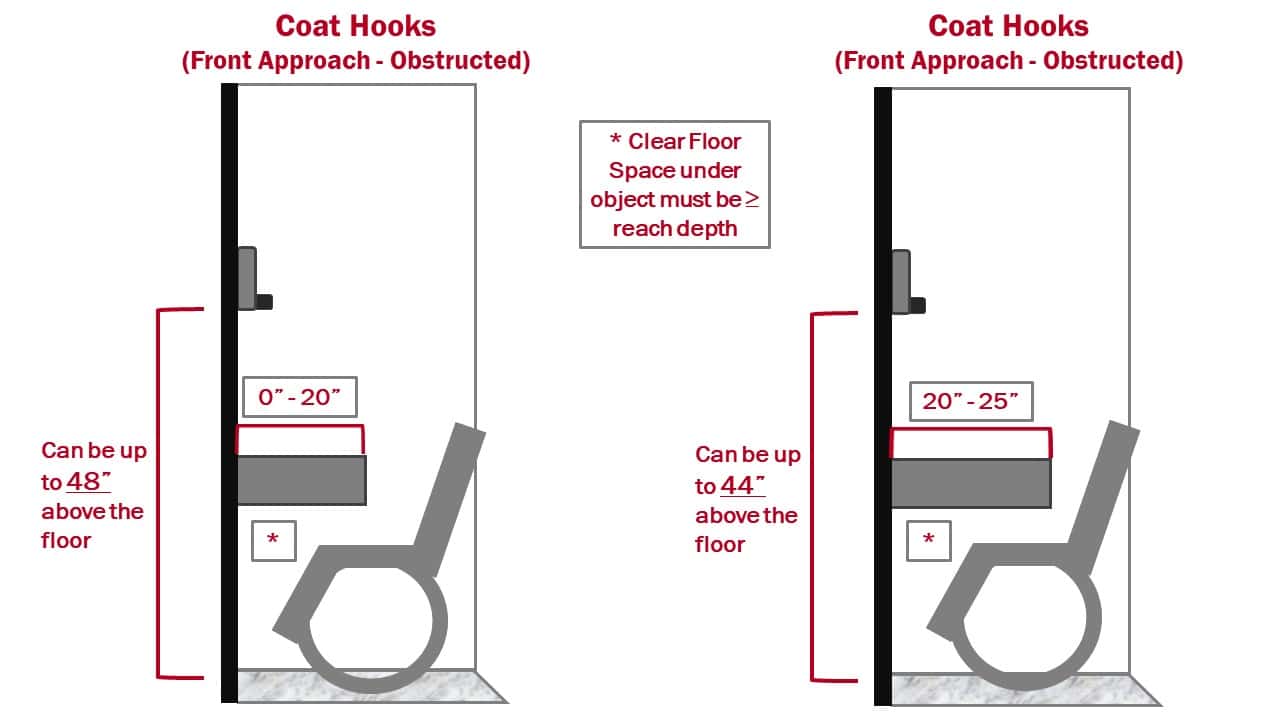
For obstructed forward reaches there are two ranges. The first step for you is to measure how deep your obstruction is. If the obstruction is less than 20 inches deep then the item you are mounting can be placed up to 48 inches maximum above the floor. If the obstruction is more than 20 inches deep then the item can only be placed up to 44 inches maximum above the floor. Obstructions cannot be more than 25 inches deep for forward reaches. You must also have the right amount of clear floor space underneath your obstructions. The space should be at least as deep as your obstruction is and high enough to give proper toe and knee clearance (section 306). Basically, people who are in a wheelchair should be able to fit their legs underneath the obstruction to get close enough to reach the item you mounted.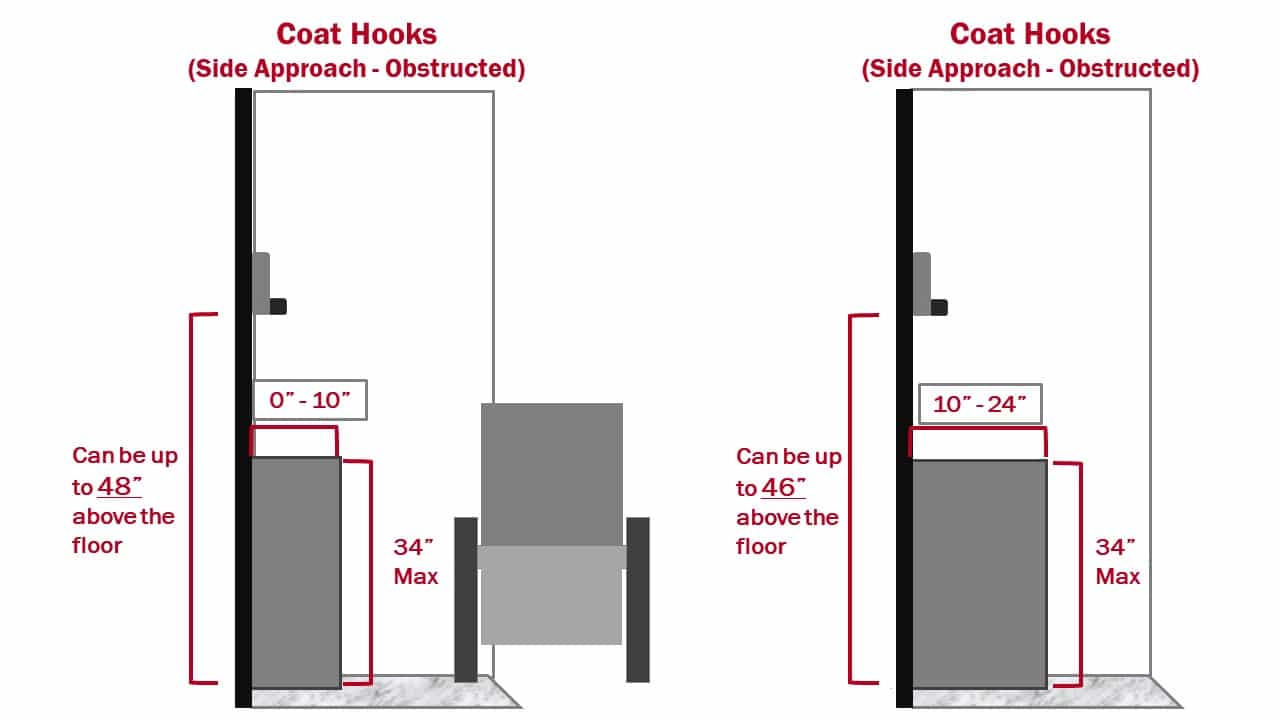
Side Reach
Side reaches are a little different. You don’t need any clear space beneath your obstructions and obstructions can be up to 34 inches tall from where they sit on the ground. If the obstruction is less than 10 inches deep then you can mount your item up to 48 inches maximum above the floor. If the obstruction is more than 10 inches deep the item can only be mounted up to 46 inches above the floor. Obstructions cannot be more than 24 inches deep for side reaches.Other Accessories
You may have other accessories you want in your bathroom that we haven’t mentioned here. Maybe you want to mount a hand dryer or soap dispenser near your sinks. The most important thing to remember with these is that you want people to be able to reach them. That means that their usable parts like buttons or outlets should be in the reach ranges listed above. An automatic soap dispenser for example should have the outlet that dispenses soap be between 15 inches and 48 inches unless there is an obstruction (like a countertop). Then it should follow the rules for forward or side reaches depending on the situation. It’s recommended that for hand dryers at least one should have its outlet no higher than 40″ off the ground. All items should also be easily approachable with the right amount of clear floor space around them (keep in mind your 30-inch x 48-inch box). Remember, if you are going to place items on the floor, like trashcans, they can’t block the necessary clear space, turning space, or pathways needed to move around the bathroom. Not sure what other accessories you might want? Check out our selection.Toilet Height
Grab Bars
Toilet Paper Dispensers
Toilet Position
Wheelchair-Accessible Stalls
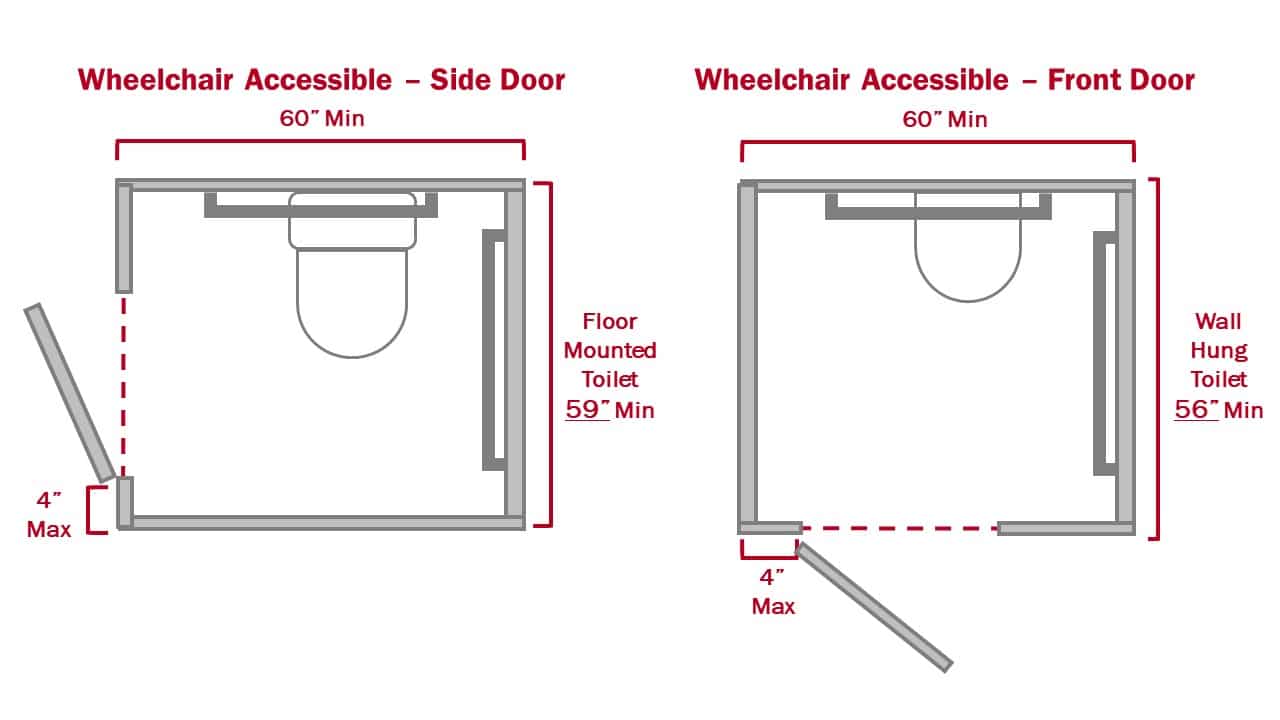
Stall Size
Wheelchair-accessible stalls must be at least 60 inches wide minimum. As far as depth, if the toilet is floor mounted the stall must be 59 inches deep minimum but if the toilet is wall mounted it only has to be 56 inches deep minimum. This space can include each of the items and spaces below but no others. So if for example, you want to add a baby changing station you need to allot more room.- Toilet
- Associated grab bars
- Dispensers
- Sanitary napkin disposal units
- Coat hooks
- Shelves
- Accessible routes
- Clear floor space
- Clearances required at other fixtures
- Turning space
Stall Doors
Most wheelchair-accessible stalls have their doors swing outward so an extra clear floor space box (30 inches x 48 inches) isn’t needed inside the stall. Doors can be in the front panel or the side panel furthest from the toilet. Either way, the door can only be 4 inches maximum from the other panel (see diagram). For example, if the door is in the front panel it can only be 4 inches maximum from the side panel furthest from the toilet and vice versa. As far as clearance for doors (extra space around them) check out the 2010 standards section 404.2 for more details and diagrams.Other Standards
Here are a couple more things to keep in mind when planning your stalls:- Doors should be self-closing
- There can only be 5 pounds of force maximum to open stall doors
- People should be able to approach the door with their left or right hand
- Remember to mount grab bars on the back wall and side wall closest to the toilet
- You need to include a space for people’s toes under the door. It needs to be 9 inches tall minimum and 6 inches deep minimum.
Ambulatory Accessible Stalls
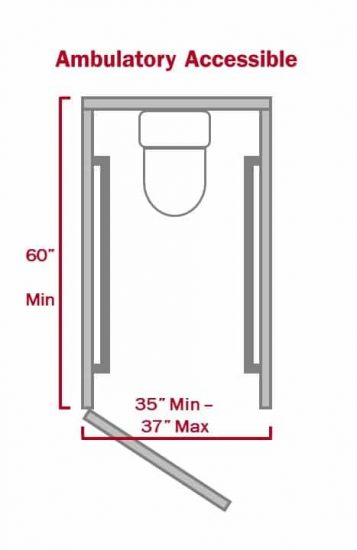
Stall Size
Ambulatory accessible stalls must be at least 60 inches deep minimum. For width, stalls can be from 35 inches wide minimum to 37 inches wide maximum. Just like wheelchair-accessible stalls, this space can overlap with the items and spaces below. But if you want to add others need to add more space.- Toilet
- Associated grab bars
- Dispensers
- Sanitary napkin disposal units
- Coat hooks
- Shelves
- Accessible routes
- Clear floor space
- Clearances required at other fixtures
- Turning space
Stall Doors
The number one thing about doors for ambulatory accessible stalls is that they must meet the standards in section 404 of the 2010 standards. Because the doors can swing inward or outward and to the left or to the right many different clearances need to be taken into account. If your doors are going to swing inward you’ll need more than the minimum space in the stall. We’ve linked the standards so you can check out the space for the type of door you want. But if the diagrams are confusing or you have more questions give us a call. We’re happy to help.Other Standards
Ambulatory accessible stalls have many similar requirements to wheelchair-accessible stalls:- Doors should be self-closing
- There can only be 5 pounds of force maximum to open stall doors
- Remember to mount grab bars on either side wall
Urinals
Lavatories and Sinks